There is no "one size fits all" breast lift
In my conversations with patients I find that the topic of breast lift is a prime source for misunderstandings. I wrote this blog to help clarify some of the issues and streamline the conversation.
As you see from the table below there are six choices and I will go over their meaning.
Level 1 Lift
Level 1 Lift with Implant
Level 2 Lift
Level 2 Lift with Implant
Level 3 Lift
Level 3 Lift with Implant
I have simplified the process of understanding breast lift by creating three categories of lift and then I added the option of a breast implant that can be done at the same time resulting in the six choices.
The categories take into account the scars on the breast, the length of time the procedure takes, and accordingly the cost of the procedure.
The goal of the breast lift is to have a firm breast mound and a nipple-areola complex that is sitting on top of it. Therefore, when we are looking at a breast for the possibility of lifting it, we need to look at the nipple areola complex and decide:
Does it need to be raised?
Does it need to be made smaller?
We also need to look at the breast mound and decide:
Is it large enough?
Does it need to be lifted as well?
What is the quality of the skin envelope and supporting structures?
It is important to understand at this point of the conversation that there are certain landmarks on the chest that cannot be altered easily. They are the supraclavicular notch, the clavicle and very importantly the inframammary fold. It is where the breast tissue attaches to the chest wall underneath the breast. This delineated area on the chest wall is what is called the footprint of the breast on the chest wall, and it cannot be altered.
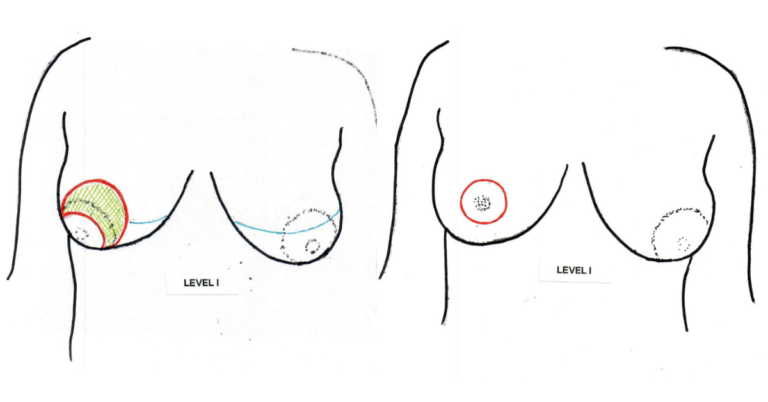
In a level one lift only the nipple areola complex is moved up to be on the top of the breast mound. It is frequently done in combination with a breast augmentation procedure. The implant will end up being above the inframammary fold and we will need to place the nipple areola complex on top of it.
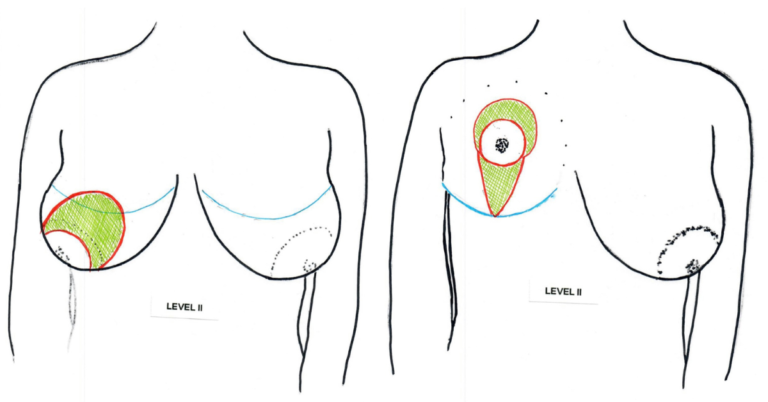
In level to lift we address the nipple areola complex and we start to address the mound making it firmer and in better position with respect to the footprint of the breast, and the infra-mammary fold.
To achieve that, a scar around the areola is not sufficient and it is extended in a vertical fashion to allow access to the lower part of the breast and tightening it creating a durable support.
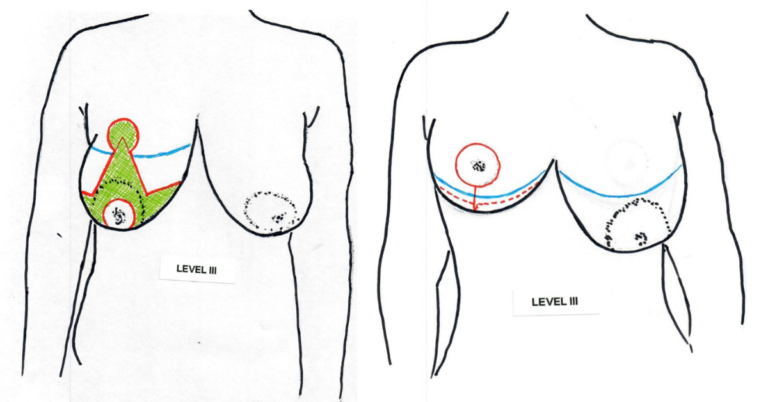
In level three breast lift there is a lot of extra skin and tissue laxity. The inverted “T” scar allows access to most of the breast for elevation and reshaping. Some of the extra skin is used to create an internal bra. Some of the extra skin is removed.
The resulting scar has the shape of an anchor. The round part from the nipple elevation and the rest from the breast reshaping.

In this image the blue line is the inframammary fold. The red line is the incision that will be made and the green area is the amount of skin that will be removed to allow for elevation of the nipple Areola complex. The second image shows the final scar.


Part of the marking is similar to the level one lift however we need to elevate the mound and support the bottom part of the breast. In the second image the breast is manually lifted on the chest and a triangular shaped area of skin excision is marked. This will allow access to the lower pole of the breast and suturing the breast tissue together will lift it and create the support to the lower breast. The third image shows the final scar around the Areola and vertically down to the inframammary fold.


Against the blue line shows the inframammary fold the red or the incision that will be made and the green is the skin that will be removed. When more substantial elevation is needed, the breast tissue is moved up and the skin pulled down over it to create a bra like effect. This results in the third scar that is horizontal. The last image shows the final scars around the nipple, like level 1, one vertically like the level 2 and a third scar is added hidden in the infra mammary fold.

